Baklava may look like the work of a pastry wizard, but with good ingredients, a little patience, and the right method, you can make a genuinely authentic version in your own kitchen. The secrets are simple: thin layers, real butter, a generous hand with the nuts, and a syrup poured at exactly the right moment. This guide will take you step by step through the process, from the shopping list to the first satisfying crackle of the finished piece.
Gather Your Ingredients
You need only a handful of ingredients for baklava, but each one matters. The dough is phyllo, the paper-thin pastry sold frozen in most supermarkets.
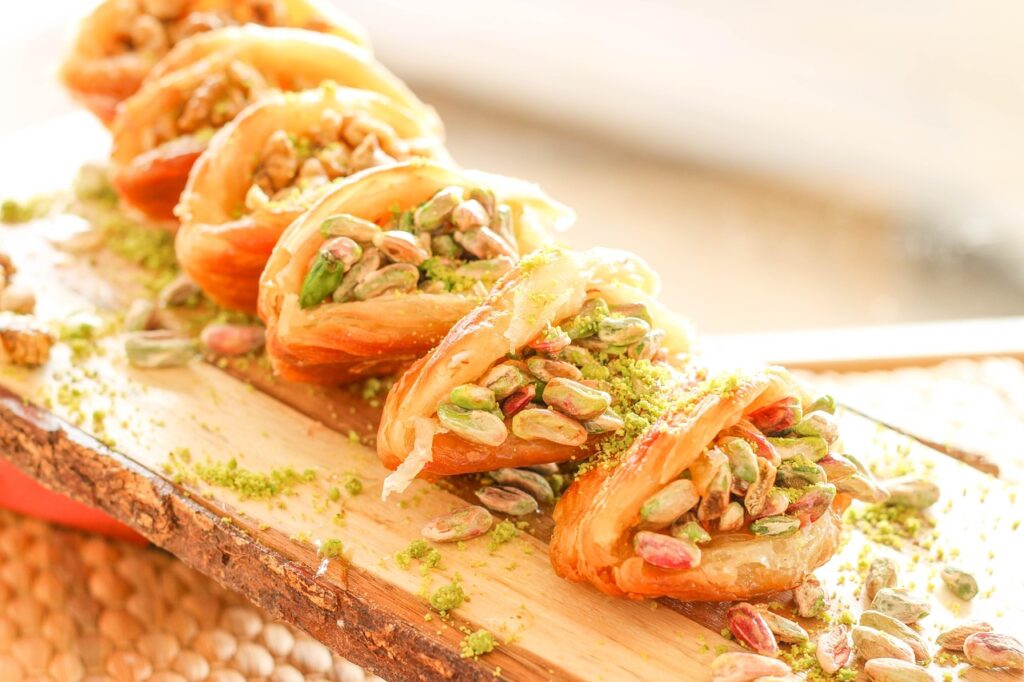
For the filling, choose pistachios, walnuts, or hazelnuts, depending on the style you want to make. Pistachio gives the classic Turkish character; walnut is the other great tradition.
You will need unsalted butter for the layers, and plenty of it. Real butter is essential, because margarine or oil changes both the flavor and the crispness.
For the syrup, sugar and water are the base, with a squeeze of lemon juice to keep the sugar from crystallizing. Some recipes add a spoon of honey for depth.
A kitchen scale helps, because baklava rewards precision, and a pastry brush is essential for the butter. Set everything out before you begin, since the assembly moves quickly once the phyllo is open, and a prepared cook is a calm cook.
Choosing the Right Nuts
The nut is the soul of baklava, so choose carefully. For pistachio baklava, look for bright green kernels, as their flavor and color define the dessert.
If pistachios are hard to find, good walnuts are a worthy alternative. Choose fresh walnuts and grind or chop them to a coarse, even texture, not a paste.
Roast the nuts lightly before using them if you wish; a few minutes in a dry pan deepens their aroma. Let them cool completely before spreading them into the pastry.
Buy nuts from a source with good turnover, because stale nuts will ruin the baklava. Freshness is everything in this dessert.
The amount of filling is also a matter of taste, and Turkish baklava is famously generous. When in doubt, add a little more nuts than the recipe suggests, because the filling is the heart of the dessert and a thin layer is the most common disappointment.

Meeting Your Phyllo
Phyllo, also called filo, is the modern baker’s great ally. It is sold in thin sheets, usually frozen, and it needs to be thawed slowly in the refrigerator before use.
Handle the sheets with dry hands and a light touch. Phyllo tears easily, but a torn sheet can be patched with butter and a spare scrap, so do not panic.
Keep the stack covered with a damp cloth while you work, because phyllo dries out and becomes brittle within minutes of exposure to air.
The quality of the phyllo matters. Look for the thinnest sheets you can find, since thin layers are the whole point of baklava.
Most phyllo comes in a roll of stacked sheets, and you will use a handful at a time. A damp tea towel over the stack is your best friend, and if a sheet tears, simply brush it with butter and lay the next one over the gap. The butter heals all sins.
Building the Layers
Set out a rectangular baking pan, ideally metal, which conducts heat better than glass. Brush the bottom and sides generously with melted butter.
Lay one sheet of phyllo in the pan and brush it with butter, then repeat. You want about eight to ten buttered sheets as the base.
Spread the chopped nuts evenly across the base, then continue with another eight to ten buttered sheets on top. The structure is a sandwich of pastry and nuts.
Tuck the edges of the sheets down as you go, and brush the very top layer with extra butter. The butter is what turns the phyllo golden and crisp.
The butter should be melted gently, and it should be applied while still liquid. A spoonful on each sheet, spread with the brush in long strokes, covers the surface evenly without saturating it. The goal is a light, even coat, not a soaking.

Cutting the Diamonds
Before baking, the baklava must be cut, because cutting a hot, syrup-soaked pastry is a mess. Use a sharp knife to mark the pattern in the raw dough.
The classic shape is the diamond. Cut parallel diagonal lines one way, then parallel diagonal lines the other way, creating a lattice of diamonds.
Cut all the way through to the bottom of the pan, so the syrup can reach every piece. It is fine if the knife drags slightly; the cut will open as it bakes.
Leave the pieces in the pan, do not separate them. They will bake together and soak together, and you will break them apart when serving.
Some bakers cut the baklava into squares or rectangles, and modern shops sometimes make rolled versions, but the diamond is the classic shape and the easiest to recognize. Whichever shape you choose, consistency is what matters most.
Butter and Oven
Preheat the oven to a moderate heat, around one hundred and sixty degrees Celsius, and bake the baklava slowly. Patience at this stage is everything.
The baklava is ready when the top is deep golden brown, which can take forty-five minutes to an hour. Listen for the gentle bubbling of butter.
If the edges brown faster than the center, rotate the pan, and cover the edges with foil if they threaten to burn. Even color means even texture.
Let the baked baklava rest for a few minutes before pouring the syrup. The pastry should still be hot, but not straight from a screaming oven.
Ovens vary, so begin checking the baklava after about thirty minutes. The top should be deeply golden, with the edges of the layers visible, and the whole tray should look dry and crisp, not oily. Trust your eyes over the clock.

The Sugar Syrup
While the baklava bakes, make the syrup. Combine sugar and water in a saucepan and bring to a gentle boil, stirring until the sugar dissolves.
Add a squeeze of lemon juice, which prevents crystallization, and simmer until the syrup thickens slightly. It should be thin enough to pour, but not watery.
Some recipes add honey or a spoon of rose water at the end for fragrance. These touches are optional but delightful.
Let the syrup cool to room temperature while the baklava bakes. The temperature difference between hot pastry and cool syrup is the key to the perfect texture.
If you like, add a few whole cloves or a strip of lemon peel to the syrup while it simmers, then strain them out before pouring. This gentle perfume is a traditional touch that many home bakers enjoy, though the classic version is simpler.
The Golden Rule of Pouring
The golden rule of baklava is simple: hot pastry, cool syrup. The pastry must be warm enough to absorb, and the syrup must be cool enough to soak in slowly.
Pour the syrup evenly across the whole tray, a little at a time, letting it find its way between the cuts. You will hear the pastry hiss as it drinks.
Resist the urge to add more syrup than the recipe calls for. A baklava swimming in syrup is a common failure, and it is as bad as a dry one.
Let the baklava rest for several hours, or overnight, so the syrup settles. The dessert is actually better the day after it is made.
The baklava will hiss and steam as the syrup sinks in, and the tray will look glossy within an hour. Cover the tray lightly and leave it at room temperature, and resist the urge to sample too early; the dessert needs time to settle.
Serving and Storing
Serve the baklava at room temperature, cut into its diamonds with a clean knife. Lift each piece gently, because the layers are fragile.
A single piece is a generous serving. Offer it with tea or Turkish coffee, and let the sweet and the bitter balance each other.
Store the baklava in an airtight container at room temperature, where it will keep for several days. It should never go in the refrigerator, which hardens the pastry.
If the baklava begins to dry out, a light brush of extra syrup revives it. Properly stored and treated, a tray of baklava is a gift that keeps on giving.
Troubleshooting Common Problems
If your baklava is soggy, the syrup was likely too thin, poured too generously, or added while the pastry was too cool. Next time, reduce the syrup and pour it over hotter pastry.
If the baklava is dry, the syrup may have been too thick or the baking too long. Check your oven temperature with a thermometer and pour the syrup promptly.
If the layers stick together, the phyllo was probably under-buttered. Be generous with the brush; each sheet deserves a thorough coat.
If the edges burn, cover them with foil and rotate the pan. Baking is a conversation between your oven and your tray, and a few adjustments usually solve everything.
Remember that baklava improves with practice. The first tray may be imperfect, the second better, and by the third you will understand the rhythm of the dough and the syrup. Every master baker started with a tray that was less than perfect.
Frequently asked questions
What is the secret to crisp, not soggy, baklava?
The classic rule is hot pastry and cool syrup. Pour the syrup over the baklava while the pastry is still warm from the oven, using the amount the recipe specifies. This lets the syrup soak in evenly without turning the layers to mush.
Can I use store-bought phyllo instead of making my own dough?
Absolutely. Good commercial phyllo is thin, consistent, and a genuine shortcut to excellent baklava. Thaw it slowly in the refrigerator, keep it covered with a damp cloth while working, and brush every sheet thoroughly with melted butter.
How long does homemade baklava last?
Stored in an airtight container at room temperature, baklava keeps well for several days and is often best the day after baking, when the syrup has fully settled. Do not refrigerate it, as cold hardens the pastry and dulls the flavor.

All Over Information
The All Over Information editorial team researches and writes practical English-language guides to Turkey. Facts are checked against official and local sources before publication, prices are published as dated ranges rather than quotes, and guides are revised when things change. We accept no sponsored posts, paid placements or paid links.
More guides like this

Turkish Food Markets and How to Shop like a Local
The food market is where Turkish life is at its loudest, most colorful, and most generous.

Where to Find the Best Midye Dolma (Stuffed Mussels) in Turkey
Midye dolma is a dish of places.

The History Behind Turkish Meze Platters
This is the story of how a handful of small plates became the heart of Turkish dining.

Where to Find the Best Cig Kofte in Turkey
Cig kofte is sold in almost every Turkish city, but the best versions are tied to places.
How Turkish Tea Culture Differs from British Tea Culture
Tea means something different in Turkey than it does in Britain, even though both nations are famous for their devotion to the…

Where to Find the Best Turkish Tea (Cay) in Turkey
You can find a glass of çay almost anywhere in Turkey, from a village bakery to a five-star lobby, but the best…